return to
  Bad pictures ? Click here
 L'Ambitieux, Le Trois-Ponts du Chevalier de Tourville
January 2, 2003
Happy New Year ! In this update I describe my trials and tribulations with home resin casting using room temperature vulcanizing or “RTV” rubber moulds. Magazine articles on the subject make this work seem so straightforward. In theory this is likely true, but in practice it is a task that takes a lot of experimentation and a bit of luck.
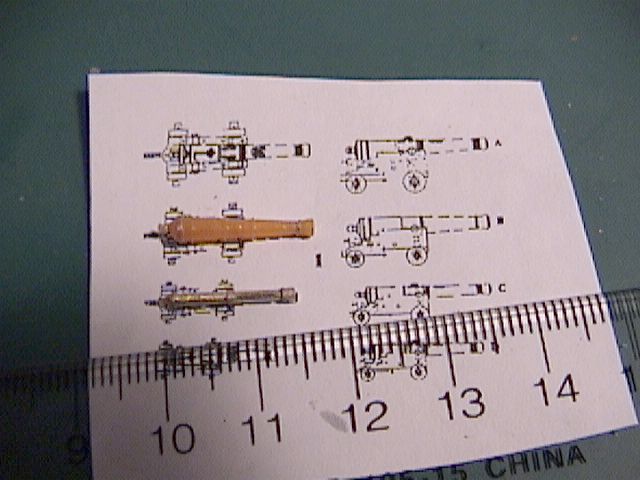
One of the major tasks on the L’Ambitieux’ interior is the construction of the cannon. This ship carried 80 of them total and I thought the quickest way to make them was to cast copies in resin. The cannon carried by this ship come in four sizes. The four sizes shown on the plans were reduced from 1:48 down to 1:192 and the two largest sizes were very similar in size that I felt that in this scale, both were essentially the same size. The same was found for the two remaining sizes except for length. This simplified my task in that only two cannon patterns were required — one for the two large caliber cannon, and one pattern for the smaller caliber cannon. In the case of the smaller caliber cannon, the master pattern was made to the dimensions to the longer of the two as the finished castings could be cut down to represent the shortest cannon. The two master patterns and scaled down plans are shown in the photo below.

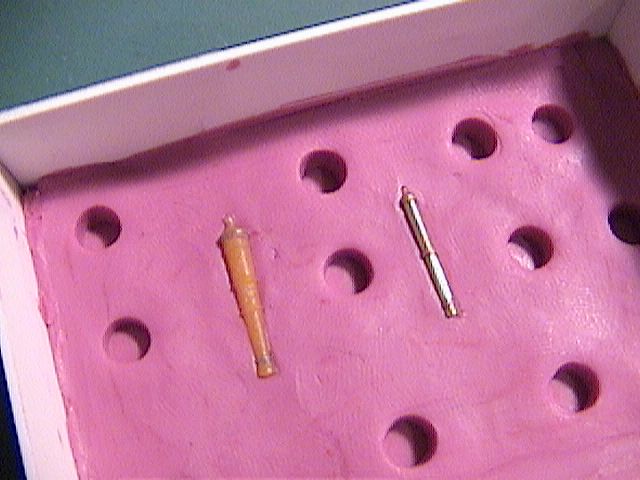
The pattern for the larger cannon came from a modified plastic kit part. The donor kit was some Russian made plastic kit picked up at a swap meet years ago and the cannon contained therein had the right length and taper. All I had to do was reshape the cannon muzzle a bit and add reinforcing rings from wire. The smaller cannon was made from a piece of scrap brass rod turned down to a taper. Reinforcing rings were added from wire and the flared muzzle was shaped by dipping the end of the cannon into a puddle of superglue a couple of times, allowed to harden off and shaped with sandpaper. The casabels on the cannon breeches were made the same way. A piece of fine wire was repeatedly dipped in a puddle of superglue until a nice ball was formed. A hole drilled into the breech of the cannon and the cascabel attached.
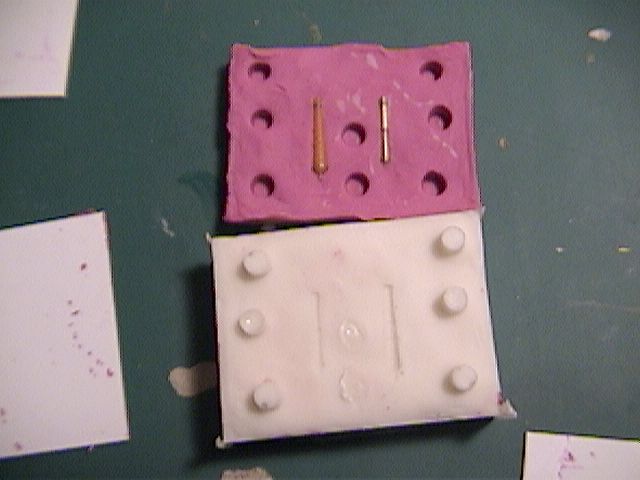
The next step was to make the rubber mould. I made the mould three times before I got one that worked out! A mould box was made out of styrene plastic and the bottom half filled in with modelling clay (I used Kleen Klay, which is recommended by the resin and rubber makers as the best one because it contains no chemicals that could affect the setting of the RTV rubber). The masters were carefully pressed into the Kleen Klay to about half its length. A few depressions were made with a dowel into which the RTV rubber will flow into to form location pegs. The whole surface of the mould was sealed with a sprayed coat of Testor’s Dullcote.

The rubber I used is from Plasticast (RTV-320AC Reg). The rubber and catalyst was mixed according to the instructions and carefully poured into the mould. The RTV rubber was supposed to set in 24 hours but for some reason, it did not set after 48 hours! It hardened a bit but remained a sticky mess. I dug out the masters, cleaned them off and started again! The second attempt worked fine and the rubber hardened off nicely in 24 hours at room temperature. The rubber mould was pulled out of the mould box and the Kleen Klay discarded.
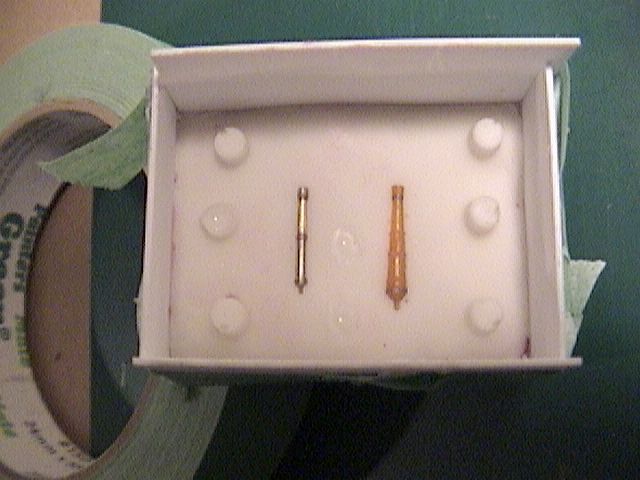
The mould box was reassembled and the rubber mould half reinserted. The masters were placed back into their placed into the rubber mould and whole surface was sealed with a sprayed coat of Testor’s Dullcote. Another batch of RTV rubber was mixed and poured into the mould box to form the second half of the mould. This hardened off in 24 hours and the mould box removed and the two halves of the mould separated.

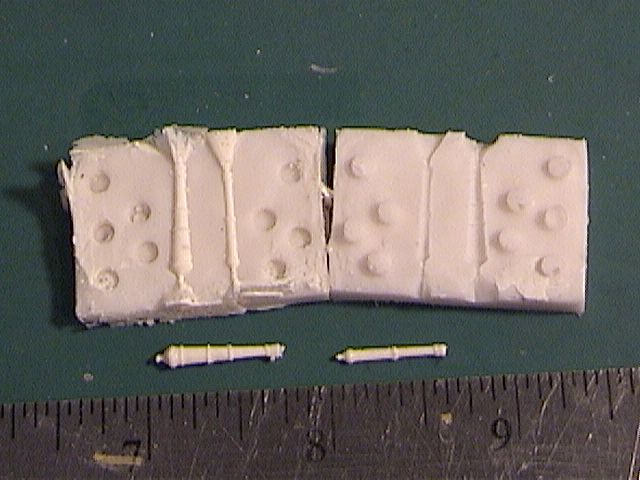
Here I found another problem. There were air bubbles in the second half of the mould and the air bubble voids were right up against the masters. Resin would fill these voids leaving your final casting with resin pimples! I decided to make a third mould, this time carefully spreading out the rubber over the masters to ensure no air bubbles were against the parts. I am happy to report that third time lucky and I has a nice useable mould. I decided to cast parts using the flawed mould and the good quality one. The pictures below show the quality of the casting from the flawed mould. Although the castings look quite rough here, a bit of putty and sanpaper work makes renders them quite acceptable in this tiny scale.


Before casting, a reservoir for the resin must be cut into the mould at the top where you pour in the resin, and air evacuation vents at the bottom. These have to be fairly large to ensure enough resin goes in and the air in the mould cavities has somewhere to go out. This was a matter of trial and error. I kept enlarging the holes until I got relatively bubble free castings.
Casting is a chore and I cannot say I like doing it. The used Por-A-Kast two part urethane resin. The moulds were first sprayed with a coat of mould release (Synlube 531 release agent, a wax based product). The mould halves were aligned and held together with an elastic band. The Por-A-Kast mixed and poured into the top of the mould. Because I had large air evacuation vents cut into the bottom of the mould, the resin came dripping out the bottom. This was OK because I could also see that in so doing, any air in the mould was being pushed out. In one of the pictures below, you can see an air bubble coming out of the mould. However, it was a messy affair as I had to keep pouring more resin into the top of the mould and it kept dripping out of the bottom, and all over my fingers. Sometimes to help the resin flow into the mould and displace any air bubbles I had to rap the sides of the mould sharply with my fingers, or invert the mould a few times until the resin begins to harden off. The resin starts to cure in about 40 seconds and turns into a honey like consistency and stayed put. The mould was finally set aside and in about 30 minutes the castings had hardened enough to take out of the mould. Be careful when taking the castings out of the mould. I bent a few and on many of them, the cascabels broke off.
Despite all my precautions, not all casting came out bubble free. I would say that about 40% of them had air bubbles. These voids are corrected with modeling putty (such as Tamiya’s grey stuff) but it’s a tedious business and I really have a deep respect for resin model manufacturers who have to deal with this problem all the time. Anyways, after about a week of casting, I had the required number of cannon for L’Ambitieux. It was not a pleasant task but I suppose a bit easier than turning 80 identical miniature cannon on a lathe, one at a time. All I can say is that I am glad that part is over!
The gun carriage parts were made using the time-honoured method of slotting and notching a strip of wood (I used holly) and cutting off the strip like slices of bread.
That is it for this update. In a later update I will show the assembly of the cannons in detail. Right now I am quite tired of this project and will take a break and simply assemble one of those excellent multimedia resin and photo-etched brass warship kit my wife gave me for Christmas!